goodman heat pump troubleshooting guide
Navigating issues with your Goodman heat pump requires understanding error codes, inspecting components like filters and coils, and checking thermostat settings.

Understanding Your Goodman Heat Pump System
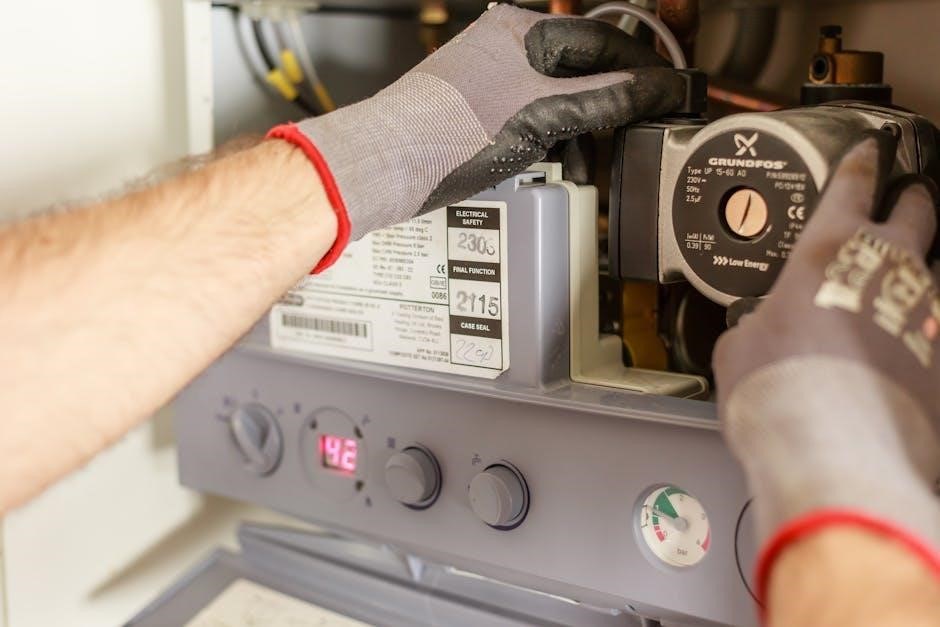
Goodman heat pumps offer efficient heating and cooling, but understanding their operation is crucial for effective troubleshooting. These systems utilize refrigerant to transfer heat, unlike traditional furnaces that generate it. A heat pump operates on a cycle, reversing the flow of refrigerant to provide either heating or cooling. The outdoor unit houses the compressor, condenser coil, and fan, while the indoor unit contains the evaporator coil and blower.
Key components include the thermostat, which controls the system, and various safety switches like the rollout switch. Recognizing how these parts interact is vital when diagnosing problems. Dirty filters and coils significantly impact performance, restricting airflow and potentially triggering error codes. Regular maintenance, as highlighted in various guides, is paramount for optimal function. Familiarizing yourself with your system’s manual provides detailed insights into its specific operation and potential issues. Knowing the basics empowers homeowners to address minor problems and accurately communicate concerns to HVAC professionals when needed.
Common Goodman Heat Pump Issues
Goodman heat pump owners frequently encounter issues ranging from simple to complex. A common problem is the outdoor unit failing to turn on consistently, often requiring a breaker reset as reported in online forums. This can be linked to error codes that require decoding to pinpoint the root cause. Another frequent issue involves inconsistent heating, potentially stemming from fan motor problems or refrigerant leaks.
Dirty air filters and coils are major contributors to performance decline and error code triggers. Rollout switch activation, indicated by six flashes, suggests potential heat exchanger problems, demanding immediate professional attention. Power failures to the unit are also reported, necessitating a check of the electrical supply and system components. These issues often manifest as error codes, making understanding these codes essential for effective troubleshooting. Addressing these common problems promptly can prevent further damage and maintain system efficiency, ultimately saving on energy costs and repair bills.
Decoding Goodman HVAC Error Codes
Goodman HVAC systems utilize error codes to signal malfunctions, requiring homeowners to understand their meaning for effective troubleshooting. These codes act as a diagnostic language, guiding users toward potential problem areas within the system. While some issues can be addressed with basic checks – like filters or thermostat settings – many necessitate professional intervention, particularly those involving gas or electrical components.
Successfully decoding these codes is the first step toward resolving the issue. For instance, six flashes typically indicate rollout switch activation, hinting at heat exchanger problems. Identifying the specific code allows for targeted inspection and repair. Consulting the Goodman HVAC system manual is crucial, as it provides detailed explanations of each code and suggested solutions. Remember, attempting repairs without proper knowledge can be dangerous and may void warranties; therefore, prioritize safety and consider professional assistance when dealing with complex error codes.

Error Code: No Power to the Unit
Encountering a “No Power” error with your Goodman heat pump signifies a complete lack of electrical supply to the outdoor unit. Initial troubleshooting should focus on the simplest solutions. First, verify the main power switch to the unit is in the “ON” position. Next, check the circuit breaker dedicated to the HVAC system in your electrical panel – a tripped breaker is a common culprit. Reset it if necessary, but if it trips again immediately, a more serious electrical issue exists.
Further investigation involves inspecting the disconnect switch, usually located near the outdoor unit. Ensure it hasn’t been accidentally switched off. If all these checks pass, the problem may lie within the wiring or the control board itself. Caution: Electrical work can be dangerous; If you’re uncomfortable or unsure, immediately contact a qualified HVAC technician to diagnose and repair the issue safely. Do not attempt complex electrical repairs yourself.
Error Code: Fan Motor Issues
Goodman heat pump fan motor errors indicate a problem with the outdoor unit’s fan, crucial for heat exchange. A common symptom is the fan not spinning, even when the unit is calling for heat or cooling. This can manifest inconsistently, as reported by some users who found temporarily flipping the breaker restored operation. However, this is a temporary fix, not a solution.
Troubleshooting involves checking for obstructions that might be physically preventing the fan from turning. Inspect the fan blades for debris or ice buildup. If clear, the issue could be a faulty capacitor, a common component failure. A failing capacitor often results in a humming sound but no fan movement. Warning: Capacitors store electrical charge even when power is off. Discharge it safely before handling. If you lack experience, call a technician. More complex issues may involve a failing fan motor or control board, requiring professional diagnosis and repair.
Troubleshooting Fan Motor Problems
Begin by visually inspecting the fan blades for any obstructions – leaves, ice, or debris can prevent operation. Ensure the fan spins freely by hand (with power OFF!). Next, carefully check the capacitor, a frequent culprit. A bulging or leaking capacitor indicates failure and requires replacement. Caution: Capacitors hold a charge; discharge before handling!
If the capacitor tests good, use a multimeter to verify voltage is reaching the fan motor. No voltage suggests an electrical issue upstream – a faulty contactor or control board. Low voltage could indicate wiring problems. Remember, inconsistent operation, like the unit sometimes working after a breaker reset, points to intermittent connections or a failing motor. If you’re uncomfortable with electrical testing, or suspect a motor or control board issue, immediately contact a qualified HVAC technician. Attempting repairs without proper knowledge can be dangerous and void warranties.
Error Code: Compressor Problems
Compressor issues are often serious and require professional attention. Initial checks involve verifying power reaches the compressor; a lack of voltage signals electrical faults – check the contactor and overload protector. However, diagnosing compressor failures goes beyond simple voltage tests.

Listen for unusual noises – clicking, humming, or grinding sounds can indicate internal damage. A non-running compressor might be locked up due to overheating or mechanical failure. Crucially, refrigerant leaks frequently accompany compressor problems, reducing cooling capacity and potentially damaging the compressor further. Do not attempt to handle refrigerant; it requires EPA certification. Always prioritize safety and call a qualified HVAC technician. Ignoring compressor issues can lead to complete system failure and costly replacements. Proper diagnostic tools are essential for accurate assessment.
Diagnosing Compressor Failures
Accurate diagnosis is key when facing compressor issues. Begin with a visual inspection for physical damage – burnt wires, bulging capacitors, or oil leaks. Next, utilize a multimeter to check the compressor’s windings for shorts to ground or open circuits. Resistance readings outside the manufacturer’s specifications indicate winding failure.
Employ a megohmmeter (Megger) for a more comprehensive insulation test, revealing hidden degradation. Confirm the start and run capacitors are within tolerance; faulty capacitors can prevent the compressor from starting. Remember, refrigerant charge significantly impacts compressor performance; low refrigerant levels strain the compressor. However, refrigerant handling requires EPA certification. Professional technicians use specialized tools like leak detectors and pressure gauges for precise diagnosis. Attempting repairs without proper training and equipment can exacerbate the problem and void warranties.

Error Code: Refrigerant Leaks
Refrigerant leaks significantly diminish heat pump efficiency and can lead to compressor failure. Identifying the source requires specialized equipment and EPA certification due to environmental regulations. Common leak locations include flared connections, valve stems, and the evaporator/condenser coils. Technicians utilize electronic leak detectors and bubble solutions to pinpoint even minute leaks.
Pressure testing with nitrogen can also reveal leak points, but must be performed cautiously. Never vent refrigerant into the atmosphere; proper recovery and disposal are crucial. Addressing a leak involves brazing or replacing the affected component, followed by evacuation of the system to remove air and moisture. Subsequently, the system must be recharged with the correct refrigerant type and amount, as specified on the unit’s nameplate. Ignoring refrigerant leaks not only reduces performance but also poses environmental risks and can cause costly damage to the compressor.
Error Code: Rollout Switch Activation (6 Flashes)
Six flashes on your Goodman heat pump typically indicate a rollout switch activation, signaling a potentially dangerous situation involving the heat exchanger. This switch is a safety device designed to shut down the system if abnormal combustion occurs, preventing overheating and potential fire hazards. Possible causes include a blocked flue pipe, improper gas pressure, or a cracked heat exchanger.
Crucially, a rollout switch activation should not be ignored and requires immediate attention from a qualified HVAC technician. Attempting to bypass or reset the switch without addressing the underlying issue is extremely dangerous. A technician will thoroughly inspect the combustion chamber, flue pipe, and gas supply to diagnose the root cause. Heat exchanger integrity is paramount; cracks necessitate replacement. Regular maintenance, including annual inspections, can help prevent rollout switch activation by ensuring proper ventilation and combustion efficiency. Prioritize safety and professional assistance when encountering this error code.
Inspecting Filters and Coils
Regularly inspecting and maintaining clean air filters and coils is fundamental to Goodman heat pump efficiency and preventing numerous operational issues. Dirty filters restrict airflow, forcing the system to work harder, reducing heating and cooling capacity, and potentially leading to compressor failure. Check your air filter monthly, replacing it when dirty – typically every 1-3 months, depending on usage and environmental factors.
Outdoor coils accumulate debris like leaves, grass clippings, and dirt, hindering heat transfer. Carefully clean the coils with a hose, avoiding high pressure that could damage the fins. Indoor evaporator coils can become dusty and impede airflow; professional cleaning is often recommended. Neglecting these components can trigger error codes and diminish system performance. Clean filters and coils ensure optimal airflow, improved energy efficiency, and a longer lifespan for your Goodman heat pump. Proactive maintenance is key to avoiding costly repairs.
Checking the Thermostat Settings
Before diving into complex troubleshooting, always verify your Goodman heat pump’s thermostat settings. Ensure the thermostat is set to “Heat” mode when you require heating, and “Cool” for cooling. Confirm the set temperature is higher than the current room temperature for heating, and lower for cooling. A simple misconfiguration can mimic a system malfunction, leading to unnecessary concern and investigation.
Check the thermostat’s battery level; low batteries can cause erratic behavior or a complete failure to communicate with the heat pump. If you have a programmable thermostat, review the schedule to ensure it aligns with your desired heating and cooling preferences. Consider temporarily bypassing the thermostat by directly connecting the wires (with caution and knowledge of electrical safety) to see if the heat pump responds, indicating a thermostat issue. A properly configured and functioning thermostat is crucial for accurate temperature control and efficient operation of your Goodman system.
Using the Goodman HVAC System Manual
Your Goodman HVAC system manual is an invaluable resource for troubleshooting and understanding your heat pump. It contains detailed information specific to your model, including a comprehensive list of error codes and their corresponding meanings. Refer to the manual to decode any error codes displayed by your unit, as these codes pinpoint the source of the problem.
The manual also provides guidance on routine maintenance tasks, such as filter replacement and coil cleaning, which can prevent many issues from arising. It outlines safety precautions to follow when inspecting or attempting minor repairs. Don’t hesitate to consult the manual for diagrams and illustrations that clarify component locations and wiring configurations. Locate the manual online if the physical copy is missing; Goodman’s website often provides downloadable versions. Understanding your system through its manual empowers you to address simple issues and communicate effectively with an HVAC technician when professional help is needed.
Resetting Your Goodman Heat Pump
Sometimes, a simple reset can resolve minor glitches causing your Goodman heat pump to malfunction. Begin by turning off the power to the unit at the breaker box – both the indoor and outdoor units should be disconnected. Allow several minutes (typically 5-10) for the system to completely discharge and reset its internal components.
After the waiting period, restore power to the indoor unit first, then the outdoor unit. Observe if the system restarts normally and responds to thermostat commands. If the issue persists, avoid repeatedly resetting the unit, as this won’t address underlying problems and could potentially cause further damage. Remember that resetting is a temporary fix; if error codes reappear or the problem continues, it signals a need for professional diagnosis. A reset doesn’t erase stored error codes, so checking for those after restarting is crucial for identifying the root cause;
The Importance of Regular Maintenance
Proactive maintenance is paramount for ensuring the longevity and efficiency of your Goodman heat pump, preventing many potential issues before they escalate. Regularly scheduled check-ups, ideally annually, by a qualified HVAC technician can identify and address minor problems, saving you from costly repairs down the line. This includes inspecting refrigerant levels, checking electrical connections, and lubricating moving parts.
Crucially, homeowners should perform routine tasks like cleaning or replacing air filters monthly, and ensuring outdoor coils are free of debris. Dirty filters and coils restrict airflow, forcing the system to work harder and potentially triggering error codes. Neglecting maintenance can lead to compressor failures, refrigerant leaks, and reduced heating/cooling capacity; Consistent upkeep not only extends the lifespan of your heat pump but also optimizes its performance, lowering energy bills and maintaining indoor comfort. Prioritizing maintenance is a smart investment in your home’s HVAC system.

When to Call a Qualified HVAC Technician
While some Goodman heat pump issues can be addressed with basic troubleshooting, certain situations demand the expertise of a qualified HVAC technician. Specifically, any error code involving gas or electrical components, such as a rollout switch activation (6 flashes), requires professional attention. Attempting to repair these components yourself can be dangerous and may void your warranty.
Furthermore, if you suspect a refrigerant leak, or if the compressor is failing to operate correctly, it’s crucial to contact a professional. Diagnosing compressor failures and handling refrigerant require specialized tools and knowledge. Don’t hesitate to call a technician if you’re uncomfortable performing any repairs, or if the problem persists after attempting basic troubleshooting steps. Ignoring complex issues can lead to further damage and more expensive repairs in the long run. Prioritize safety and rely on a professional for intricate HVAC problems.
DIY vs. Professional Repair
Determining whether to tackle a Goodman heat pump repair yourself or call a professional depends on your skillset and the complexity of the issue. Simple tasks, like inspecting and cleaning filters and coils, or checking thermostat settings, are generally suitable for DIY efforts. However, these preventative measures are crucial for avoiding more significant problems.
More intricate issues, such as diagnosing compressor failures, addressing refrigerant leaks, or dealing with electrical components, necessitate a qualified HVAC technician. Attempting these repairs without proper training and tools can be dangerous and potentially worsen the problem. Professional technicians possess the expertise to accurately diagnose the root cause of the issue and implement effective solutions. While DIY can save money on minor repairs, prioritizing safety and long-term system health often justifies the cost of professional service. Ultimately, assess your comfort level and the complexity of the problem before deciding.

Leave a Reply